Installing Pano
Follow this guide to set up Pano and get it running on your Minecraft server in just a few minutes.
⚙️ Requirements
Before installing Pano, make sure your environment meets the following requirements:
Java (JVM 9+)
- Pano runs on Java 9 or higher.
- Make sure the JDK or JRE is installed and accessible via your command line.
- → Download Java
MySQL 5.5+ or MariaDB
- A MySQL or MariaDB database is required to store your data.
- Default table prefix:
pano_(you can change it during setup). - → MySQL Installation Guide
Internet Connection
- An active internet connection is required during the setup process, as Pano downloads initial resources and dependencies.
Port 80 (HTTP) Open
- Make sure TCP port 80 is accessible if you’re installing on a remote server.
- Optional: If you configure SSL after installation, port 443 (HTTPS) must also be open.
📦 Downloading Pano
You can get the latest version of Pano from the official website:
- Download Latest Version →
- For older releases, visit GitHub Releases
Pano is distributed as a .jar file — just like Spigot or Paper.
After downloading, save the file somewhere convenient (for example, in a dedicated folder like /pano).
NOTE
When you first run Pano, it will extract necessary files, create directories (like plugins/ and themes/), and download required dependencies or runtimes. It is highly recommended to run it in its own dedicated folder.
🚀 Running Pano
To start Pano, open your terminal (or command prompt) and run:
java -jar Pano-<version>.jarIf a desktop environment is available, Pano will automatically launch its GUI.
Otherwise, it will continue in console mode.
🖥️ GUI Behavior
- Double-clicking the
.jarfile will attempt to launch the GUI automatically. - Use the
-noguiflag if you prefer running Pano in console mode:
java -jar Pano-<version>.jar -nogui- The built-in GUI includes a minimal console for Pano-specific commands only.
If the GUI cannot start (for example, in a headless environment), the console will continue automatically.
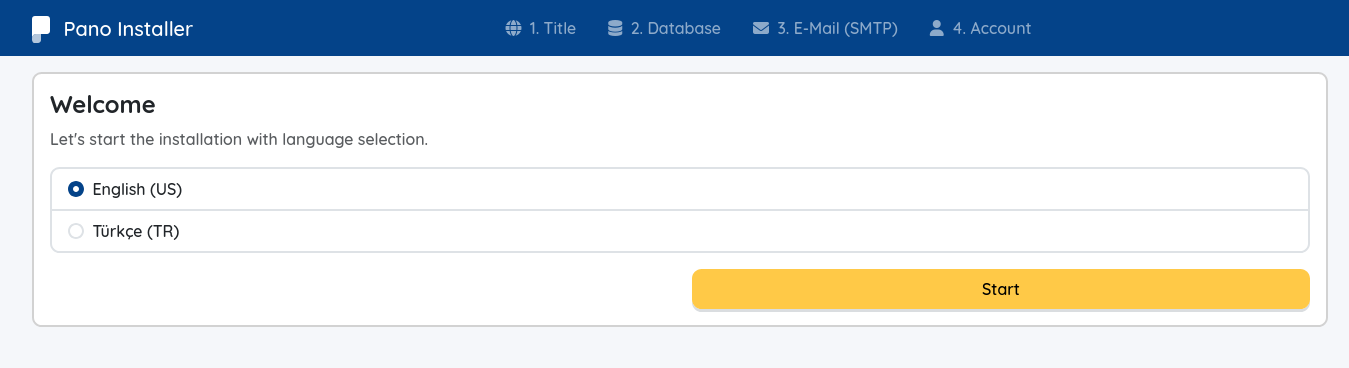
🧭 Setup Wizard (Step-by-Step)
Once Pano starts, open your browser and navigate to:
http://<your-server-ip>/Make sure port 80 is open and not used by another application.
You’ll see the Setup Wizard, guiding you through five simple steps:
Language Selection
Choose your preferred language.
(By proceeding, you agree to Pano's Terms & Conditions and Privacy Policy.)Website Configuration
Set up your website details (site name, URL, etc.).Database Setup
Enter your MySQL or MariaDB credentials.
Default table prefix:pano_(you can change it if needed).💡 Portable DB Option: On Windows (x64 or ARM64) systems, you'll see an option to use a Portable Database. Selecting this will cause Pano to automatically download, configure, and manage a portable MariaDB instance for you.
SMTP Settings (Optional)
Configure email sending if you wish.
This step is optional, and if you decide to skip it — no worries!
You can always enable or update SMTP settings later inside the Panel → Settings → Platform section.
(However, some features like password recovery may not work until it’s configured.)Account Linking & Admin Creation
- If you already have a Pano Account, you can link it here by pressing connect button — your email and username will auto-fill.
- Otherwise, create a new admin account (don’t forget your password — it’s required for login!).
To finish the setup, click Finish.
Pano will finalize the installation and automatically redirect you to your new admin panel.
🪄 You'll now be able to create posts, connect your Minecraft server, install addons, change themes, and much more!
🎮 Connecting Your Minecraft Server (Optional)
To enable game integrations and connect your Minecraft server to Pano, you'll need to install the Pano MC Plugin.
What is Pano MC Plugin?
The Pano MC Plugin acts as a bridge between your Minecraft server and Pano, enabling:
- 🔒 Secure WebSocket communication (RSA + AES-256 encryption)
- 🔄 Real-time player data synchronization
- 🧩 Automatic plugin detection and integration (AuthMe, permissions, etc.)
- 📡 Event system for in-game to web communication
Installation Steps
Download the Plugin
- Visit Pano MC Plugin Releases
- Download the appropriate JAR file for your server platform:
pano-spigot-<version>.jar— For Spigot/Paper/Foliapano-bungeecord-<version>.jar— For Bungeecordpano-velocity-<version>.jar— For Velocity
Install the Plugin
- Place the downloaded JAR file in your server's
plugins/folder - Restart your Minecraft server
- Place the downloaded JAR file in your server's
Connect to Pano
- After restart, open your Pano Admin Panel
- Navigate to Servers (in the sidebar)
- Click the + button to add a new server
- A connection modal will appear with step-by-step instructions
- Follow the steps shown in the modal to link your Minecraft server
- The plugin will automatically establish a secure encrypted connection
Verify Connection
- Once connected, your server will appear in the Servers list
- You should see server status (online/offline), player count, and other information
- The connection is now active and ready for integrations
💡 Note: You can connect multiple Minecraft servers to a single Pano instance.
Supported Platforms
- ✅ Spigot
- ✅ Paper
- ✅ Folia
- ✅ Purpur
- ✅ Bungeecord
- ✅ Velocity
What's Next?
Once your server is connected, you can:
- Enable game integrations (like AuthMeReloaded)
- View real-time player statistics
- Manage players from the web panel
- Sync in-game events with your website
🛠️ After Installation
Once installation is complete, you can customize your configuration file if needed.
Check out the Configuration Guide → for detailed instructions.
💬 Need Help?
If you encounter any issues:
- Visit the FAQ page
- Ask for help on our Discord community
- Or open an issue on GitHub Issues
Together, we make Pano better. 🚀